2010 (old posts, page 4)

Windows installers for Shapely 1.2b6

Scroll down on http://pypi.python.org/pypi/Shapely/1.2b6 to see the links for installers for Python versions 2.4/5/6. These are produced by Jakko Salli and contain GEOS 3.2.0 DLLs.

Comments

Re: Windows installers for Shapely 1.2b6

Author: vincent

I happened to have installed 1.2b6 on windows yesterday with the tarball, and geos 3.2.0 dll files from postgis renamed to 3.0.0. Worked, but ugly hack. Good to have a real good solution now, thanks Jakko !

Rtree 0.6

Busy day in the labo. Version 0.6 of Rtree, the N-dimensional R-tree package for Python, is ready.

All,

It is my pleasure to announce the release of Rtree 0.6.0.

http://pypi.python.org/pypi/Rtree/

Source code and a complete Windows self-installer (with libspatialindex 1.5.0) are provided. Version 0.6.0 requires the use of libspatialindex 1.5.0, and it will not work without it.

The following updates were made for this release:

  • 0.6.0 relies on libspatialindex 1.5.0+.
  • Intersection and nearest methods return iterators over results instead of lists.
  • Number of results for nearest() defaults to 1.
  • libsidx C library of 0.5.0 removed and included in libspatialindex
  • objects="raw" to return the object sent in (for speed).
  • .count() method to return the intersection count without the overhead of returning a list. (thanks Leonard Norrgård)
  • Improved bulk loading performance
  • Supposedly no memory leaks :)
  • Many other performance tweaks (see docs).
  • Bulk loader supports interleaved coordinates
  • Leaf queries. You can return the box and ids of the leaf nodes of the index. Useful for visualization, etc.
  • Many more docstrings, sphinx docs, etc

Howard, Brent, and Sean

Permanent link to the announcement: http://lists.gispython.org/pipermail/community/2010-April/002500.html.

GitHub users might be interested in forking http://github.com/sgillies/rtree. I'll keep it up date with and push contributions to the canonical Rtree Subversion repository.

Spatialindex 1.5.0

New C API and 64-bit support for the N-dimensional R/MVR/TPR-tree library:

All,

It is my pleasure to announce the release of libspatialindex 1.5.0. You can obtain source and compiled windows versions from:

http://trac.gispython.org/spatialindex/wiki/Releases

Additionally, I have also updated the OSGeo4W release with a 1.5.0 version as well for people using it through that avenue.

The big items addressed in 1.5.0 were:

  • Do not depend on size_t for storages. This change is backward incompatible, but it allows stored indexes to be 32/64 platform agnostic. http://trac.gispython.org/spatialindex/ticket/20
  • A C API has been added. The C API provides a nice fuzzy blanket for this wishing to insulate themselves from righteous C++ programming. In exchange for holding your hand and making choices for you at almost every level, it is rather easy to use and provides some good example code for those looking to do different things with the library. http://trac.gispython.org/spatialindex/ticket/23

More detail provided at http://trac.gispython.org/spatialindex/query?status=closed&group=resolution&milestone=1.5

Howard

This library originated in work by Hadjieleftheriou [1] and is used by Rtree. Permanent link to the announcement: http://lists.gispython.org/pipermail/spatialindex/2010-April/000186.html.

[1] M. Hadjieleftheriou, E. Hoel, and V.J. Tsotras, “Sail: A spatial index library for efficient application integration,” GEOINFORMATICA, vol. 9, 2005, pp. 367--389 [PDF]

Shapely 1.2b5

Update (2010-04-28): 1.2b7 has another important bug fix. Links are updated below.

Update (2010-04-13): 1.2b6 has an important bug fix. Links are updated below.

Shapely 1.2b5 is uploaded to http://pypi.python.org/pypi/Shapely and http://gispython.org/dist/. It contains a few enhancements that suggested themselves while I was writing example code for the user manual.

To install and try it out (in a virtualenv):

$ pip install http://gispython.org/dist/Shapely-1.2b7.tar.gz

or

$ easy_install http://gispython.org/dist/Shapely-1.2b7.tar.gz

A sneak preview of the (still in progress) manual for 1.2 is online at a non-permanent URI: http://gispython.org/shapely-1.2/manual/manual.html. Feedback on the HTML has been positive. I hope that the content is (or will be) even better. There are copious code examples and figures (with code) made using descartes. A lot of the discussion is based on Martin Davis's JTS docs, without which I'd be nowhere.

In other Shapely news, the project in which it originated has been refunded and will be the biggest part of my job over the next few years. Count on improvements to the code and the docs.

Descartes

Update (2010-04-10): http://pypi.python.org/pypi/descartes/0.1.2 adds support for GeoJSON-like objects and objects that provide the Python geo interface.

Update (2010-04-08): I've uploaded descartes 0.1, which now supports GeoJSON-like dicts (also known as "Python geo interface"), to http://pypi.python.org/pypi/descartes/0.1.

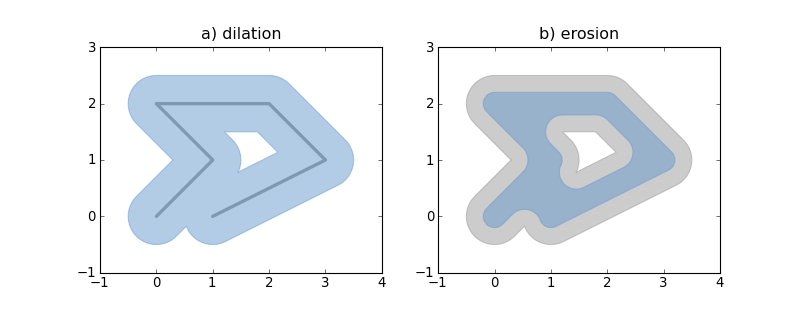
I've been making figures for the upcoming new version of the Shapely manual and developed some Shapely/matplotlib utility code that might be useful to others. The PolygonPatch class from descartes.patch takes care of all the fussy details of path creation, reducing the plotting of any polygon to a single line of code.

http://farm4.static.flickr.com/3662/4555372019_9bbed1f956_o_d.png

The plot on the left shows a line (grey) dilated to produce a polygon (blue). The plot on the right shows that same polygon (gray) eroded to produce a new polygon (blue).

from matplotlib import pyplot
from shapely.geometry import LineString
from descartes.patch import PolygonPatch

fig = pyplot.figure(1, figsize=(10, 4), dpi=180)

# Plot 1: dilating a line
line = LineString([(0, 0), (1, 1), (0, 2), (2, 2), (3, 1), (1, 0)])
ax = fig.add_subplot(121)
dilated = line.buffer(0.5)
patch1 = PolygonPatch(dilated, facecolor='#99ccff', edgecolor='#6699cc')
ax.add_patch(patch1)
x, y = line.xy
ax.plot(x, y, color='#999999')
ax.set_xlim(-1, 4)
ax.set_ylim(-1, 3)

# Plot 2: eroding the polygon from 1
ax = fig.add_subplot(122)
patch2a = PolygonPatch(dilated, facecolor='#cccccc', edgecolor='#999999')
ax.add_patch(patch2a)
eroded = dilated.buffer(-0.3)
patch2b = PolygonPatch(eroded, facecolor='#99ccff', edgecolor='#6699cc')
ax.add_patch(patch2b)
ax.set_xlim(-1, 4)
ax.set_ylim(-1, 3)

pyplot.show()

See http://bitbucket.org/sgillies/descartes/ for code and more examples.

Painting punctured polygons with matplotlib

Update (2010-04-15): See also http://sgillies.net/blog/1014/descartes.

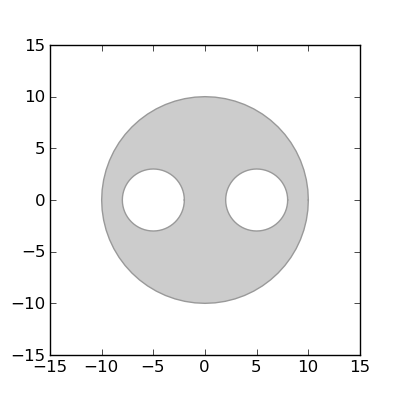
With the help of this old matplotlib-users post, I've figured out how to use Path and PathPatch to draw polygons with truly empty holes.

http://farm5.static.flickr.com/4065/4496815105_5c88a711e7_o_d.png

The code below constructs an approximately circular, doubly-holed region by buffering a point and taking the difference with a buffered pair of points, converts its boundaries to a matplotlib path, and renders this as a patch. Shapely (or rather GEOS) does the right thing with coordinate ordering, making it rather easy and efficient.

from matplotlib import pyplot
from matplotlib.path import Path
from matplotlib.patches import PathPatch
from numpy import asarray, concatenate, ones
from shapely.geometry import *

def ring_coding(ob):
    # The codes will be all "LINETO" commands, except for "MOVETO"s at the
    # beginning of each subpath
    n = len(ob.coords)
    codes = ones(n, dtype=Path.code_type) * Path.LINETO
    codes[0] = Path.MOVETO
    return codes

def pathify(polygon):
    # Convert coordinates to path vertices. Objects produced by Shapely's
    # analytic methods have the proper coordinate order, no need to sort.
    vertices = concatenate(
                    [asarray(polygon.exterior)]
                    + [asarray(r) for r in polygon.interiors])
    codes = concatenate(
                [ring_coding(polygon.exterior)]
                + [ring_coding(r) for r in polygon.interiors])
    return Path(vertices, codes)

polygon = Point(0, 0).buffer(10.0).difference(
    MultiPoint([(-5, 0), (5, 0)]).buffer(3.0))

fig = pyplot.figure(num=1, figsize=(4, 4), dpi=180)
ax = fig.add_subplot(111)

path = pathify(polygon)
patch = PathPatch(path, facecolor='#cccccc', edgecolor='#999999')

ax.add_patch(patch)

ax.set_xlim(-15, 15)
ax.set_ylim(-15, 15)
ax.set_aspect(1.0)

fig.savefig('polygon-holes.png')

No more faking it.

Bootstrapping a Python project

Here are my notes on starting a brand new, versioned, readily distributed Python project. Examples show a bash session, but Python, virtualenv, pip, distribute, paster, and hg all work on Windows (from whence more and more Python GIS programmers come) as well.

1. Create a fresh virtual environment. Why? So you don't clutter your system Python with in-development code, and to keep possibly conflicting versions of dependencies out of your development environment. It's probably even more useful for working on code that we may clone from another repository than it is for starting from scratch.

$ virtualenv --distribute foo
New python executable in /tmp/foo/bin/python2.6
Also creating executable in /tmp/foo/bin/python
Installing distribute....done.

2. Install paster if it wasn't already installed under our original Python (or if you used the --no-site-packages option). It's a script that creates a basic, normal source layout for a new package, prompts us for essential project metadata, and writes a working setup.py.

$ cd foo
$ ./bin/pip install PasteScript
Downloading/unpacking PasteScript
  Downloading PasteScript-1.7.3.tar.gz (127Kb): 127Kb downloaded
  Running setup.py egg_info for package PasteScript
Downloading/unpacking Paste>=1.3 (from PasteScript)
  Downloading Paste-1.7.2.tar.gz (373Kb): 373Kb downloaded
  Running setup.py egg_info for package Paste
Downloading/unpacking PasteDeploy (from PasteScript)
  Downloading PasteDeploy-1.3.3.tar.gz
  Running setup.py egg_info for package PasteDeploy
    warning: no files found matching 'docs/*.html'
    warning: no previously-included files found matching 'docs/rebuild'
Installing collected packages: Paste, PasteDeploy, PasteScript
...
Successfully installed Paste PasteDeploy PasteScript

3. Create the new project.

$ ./bin/paster create -t basic_package foogis
Selected and implied templates:
PasteScript#basic_package  A basic setuptools-enabled package

Variables:
  egg:      foogis
  package:  foogis
  project:  foogis
Enter version (Version (like 0.1)) ['']: 0.1
Enter description (One-line description of the package) ['']: FooGIS
Enter long_description (Multi-line description (in reST)) ['']:
Enter keywords (Space-separated keywords/tags) ['']: gis
Enter author (Author name) ['']: Sean Gillies
Enter author_email (Author email) ['']: sean@example.com
Enter url (URL of homepage) ['']: http://example.com/foogis
Enter license_name (License name) ['']: DWTFYWWI
Enter zip_safe (True/False: if the package can be distributed as a .zip file) [False]:
Creating template basic_package
Creating directory ./foogis
  Recursing into +package+
    Creating ./foogis/foogis/
    Copying __init__.py to ./foogis/foogis/__init__.py
  Copying setup.cfg to ./foogis/setup.cfg
  Copying setup.py_tmpl to ./foogis/setup.py
Running /tmp/foo/bin/python2.6 setup.py egg_info

What we get is

$ find foogis
foogis
foogis/foogis
foogis/foogis/__init__.py
foogis/foogis.egg-info
foogis/foogis.egg-info/dependency_links.txt
foogis/foogis.egg-info/entry_points.txt
foogis/foogis.egg-info/not-zip-safe
foogis/foogis.egg-info/PKG-INFO
foogis/foogis.egg-info/SOURCES.txt
foogis/foogis.egg-info/top_level.txt
foogis/setup.cfg
foogis/setup.py

The package code iself is in foogis/foogis. The foogis directory holds distribution files. Metadata, README, etc.

4. This is a good time to get everything under revision control (except the egg-info, as Tarek points out).

$ cd foogis
$ hg init
$ hg add --exclude *egg-info
adding foogis/__init__.py
adding setup.cfg
adding setup.py
$ hg commit -m "Start of the FooGIS project"

5. Install nose and coverage. Nose flattens the testing learning curve and coverage tells us how comprehensive our tests are.

$ cd ..
$ ./bin/pip install nose
Downloading/unpacking nose
...
Successfully installed nose
$ ./bin/pip install coverage
Downloading/unpacking coverage
...
Successfully installed coverage

6. Write some tests. The sooner we start testing, the better. Few things are more painful than writing tests a few hundred lines of code down the road.

$ cd foogis
$ vim foogis/tests.py

Here's the first test, taking advantage of nose's conventions for finding tests.

from foogis import Point

def test_foogis():
    assert Point(0.0, 0.0).x == 0.0

Nose lets you start testing immediately, avoiding the intricacies of unittest until you need them. Before we run the tests, we'll fully activate the virtual environment, adjusting executable paths so that we don't have to be explicit about them (It's true, as pointed out in comments, that we could have done this at the outset).

$ source ../bin/activate
$ which nosetests
/private/tmp/foo/bin/nosetests

Without any code, the tests fail, of course.

$ nosetests foogis
E
======================================================================
ERROR: Failure: ImportError (cannot import name Point)
----------------------------------------------------------------------
Traceback (most recent call last):
  File "/private/tmp/foo/lib/python2.6/site-packages/nose/loader.py", line 382, in loadTestsFromName
    addr.filename, addr.module)
  File "/private/tmp/foo/lib/python2.6/site-packages/nose/importer.py", line 39, in importFromPath
    return self.importFromDir(dir_path, fqname)
  File "/private/tmp/foo/lib/python2.6/site-packages/nose/importer.py", line 86, in importFromDir
    mod = load_module(part_fqname, fh, filename, desc)
  File "/private/tmp/foo/foogis/foogis/tests.py", line 1, in <module>
    from foogis import Point
ImportError: cannot import name Point

----------------------------------------------------------------------
Ran 1 test in 0.001s

FAILED (errors=1)

7. Write code and test.

$ vim foogis/__init__.py
class Point(object):
    def __init__(self, x, y):
        self.x = float(x)
        self.y = float(y)
    def __repr__(self):
        return 'Point (%s %s)' % (self.x, self.y)

Now, we run nosetests again with the coverage module:

$ nosetests --with-coverage foogis
.
Name     Stmts   Exec  Cover   Missing
--------------------------------------
foogis       6      5    83%   6
----------------------------------------------------------------------
Ran 1 test in 0.002s

OK

The tests pass, but we're missing a test of the __repr__ method on line 6. Let's add one.

$ vim foogis/tests.py
from foogis import Point

def test_foogis():
    assert Point(0.0, 0.0).x == 0.0
    assert repr(Point(0.0, 0.0)) == 'Point (0.0 0.0)'

and re-run the tests.

$ nosetests --with-coverage foogis
.
Name     Stmts   Exec  Cover   Missing
--------------------------------------
foogis       6      6   100%
----------------------------------------------------------------------
Ran 1 test in 0.002s

OK

8. Commit the changes and make a distribution.

$ hg add foogis/tests.py
$ hg commit -m "Added a Point class, with tests"
$ python setup.py sdist
running sdist
running egg_info
writing foogis.egg-info/PKG-INFO
writing top-level names to foogis.egg-info/top_level.txt
writing dependency_links to foogis.egg-info/dependency_links.txt
writing entry points to foogis.egg-info/entry_points.txt
reading manifest file 'foogis.egg-info/SOURCES.txt'
writing manifest file 'foogis.egg-info/SOURCES.txt'
creating foogis-0.1dev
creating foogis-0.1dev/foogis
creating foogis-0.1dev/foogis.egg-info
making hard links in foogis-0.1dev...
hard linking setup.cfg -> foogis-0.1dev
hard linking setup.py -> foogis-0.1dev
hard linking foogis/__init__.py -> foogis-0.1dev/foogis
hard linking foogis/tests.py -> foogis-0.1dev/foogis
hard linking foogis.egg-info/PKG-INFO -> foogis-0.1dev/foogis.egg-info
hard linking foogis.egg-info/SOURCES.txt -> foogis-0.1dev/foogis.egg-info
hard linking foogis.egg-info/dependency_links.txt -> foogis-0.1dev/foogis.egg-info
hard linking foogis.egg-info/entry_points.txt -> foogis-0.1dev/foogis.egg-info
hard linking foogis.egg-info/not-zip-safe -> foogis-0.1dev/foogis.egg-info
hard linking foogis.egg-info/top_level.txt -> foogis-0.1dev/foogis.egg-info
copying setup.cfg -> foogis-0.1dev
Writing foogis-0.1dev/setup.cfg
creating dist
tar -cf dist/foogis-0.1dev.tar foogis-0.1dev
gzip -f9 dist/foogis-0.1dev.tar
removing 'foogis-0.1dev' (and everything under it)

The file at dist/foogis-0.1dev.tar.gz is ready to be distributed to users of our package. Let's get them to install it using pip.

$ pip install dist/foogis-0.1dev.tar.gz
Unpacking ./dist/foogis-0.1dev.tar.gz
  Running setup.py egg_info for package from file:///private/tmp/foo/foogis/dist/foogis-0.1dev.tar.gz
Installing collected packages: foogis
  Running setup.py install for foogis
Successfully installed foogis

Do read the comment below about disabling (in setup.cfg) the "dev" tag in the distribution version string. Paste's "basic_package" template isn't the optimal template for every developer community. I'm familiar with the many additional features of the "ZopeSkel" template from Zope and Plone. I can imagine that commercial or semi-commercial efforts to grow Python developer communities (particularly thinking of ESRI here) might also be served well by specialized project templates.
Comments

see also

Author: Jonathan Hartley

Brilliant, many thanks. In particular I didn't realise coverage was so easy to use, and I've never got to grips with paster - I'll give it a try now.

Also, for people looking for more of the same, this nicely complements the following, which goes into more detail on some aspects:

http://infinitemonkeycorps.net/docs/pph/

Re: Bootstrapping a Python project

Author: Sean

Thanks, Jonathan. John Kleint's howto looks excellent, and does indeed cover important stuff that i skipped, such as how to write a readme and documentation.

Re: Bootstrapping a Python project

Author: Tarek Ziadé

Nice article !

One minor point: I would not put the *.egg-info dir under revision control. It's a generated content that will change all the time, and that is not required when people get the source from the repository.

Btw: Would you be interested to include this document in the HitchHicker's guide to packaging ? (which is planned to be included in the official docs.python.org at some point) I think it's a great help for people to get started.

Re: Bootstrapping a Python project

Author: Sean

Sure, Tarek, after a little more feedback it might be worth including. I always try to avoid committing the egg-info, or remove it soon after accidentally committing it. The --exclude option (now used above) is handy.

dev releases

Author: Kevin Teague

It's also worth mentioning that setup.cfg needs to be edited before a release is made so that there is no "tag_build = dev" in the [egg_info] section (and you can get rid of the "tag_svn_revision = true" if you aren't using SVN). User's generally shouldn't be installing dev releases since they are unversioned.

Personally, I get rid of the setup.cfg and put append dev inside the setup.py file, so that there is one less file to have to think about. Opinions on this file go both ways though ...

http://philikon.wordpress.com/2008/06/05/setupcfg-considered-harmful/

Re: Bootstrapping a Python project

Author: Brian

Install paster if it wasn't already installed under our original Python (or if you used the --no-site-packages option)

Does pip respect http_proxy? I'm pretty sure urllib2 supports the http_proxy variable, so I imagine it probably does...right?

Re: Bootstrapping a Python project

Author: Marius Gedminas

Good article!

Personally I use zc.buildout instead of virtualenv: so it's one less directory level to handle, and the sandbox creation can be automated (which is useful for other people who want to check out your source tree and start working on it). It has downsides (another config file in your tree; poor documentation) and upsides (common 3rd packages are can be shared between many projects, which speeds up downloading/installing of new environments and is a killer feature in my book).

One important point that bit me recently: nose --with-coverage remembers coverage results from previous runs, so if you change something and re-run, you won't know your actual coverage. *Always* use nosetests --with-coverage --cover-erase.

Re: Bootstrapping a Python project

Author: Benjamin Sergeant

This foogis package looks very cool, can I download it somewhere ?

;) ... I'm in the April's fool mood ... didn't know about repr and pastescript, good stuff.

Re: Bootstrapping a Python project

Author: srid

Do take a look at modern-package-template as an alternative for basic_package: http://pypi.python.org/pypi/modern-package-template

de9im: DE-9IM utilities

As part of my continuing education about the theory and methods underlying Shapely, GEOS, JTS, and the OGC's Simple Features specs, I've written a small package of utilities for working with DE-9IM [1] matrices and patterns: http://bitbucket.org/sgillies/de9im/. Shapely provides the standard predicates (these are probably my favorite OGC standards) as geometry class methods,

>>> from shapely.wkt import loads
>>> p = loads('POLYGON ((1.0 0.0, 0.0 -1.0, -1.0 0.0, 0.0 1.0, 1.0 0.0))')
>>> q = loads('POLYGON ((3.0 0.0, 2.0 -1.0, 1.0 0.0, 2.0 1.0, 3.0 0.0))')
>>> p.disjoint(q)
False
>>> p.intersects(q)
True
>>> p.touches(q)
True

but what if you wanted to test whether the features touched at exactly one point only? A "side hug", you might say. Instead of computing the intersection and checking its geometry type, you can use the de9im package to define a DE-9IM matrix pattern and test it against the relation matrix for the two features. The 0 in the pattern below requires that the intersection of the boundaries of the features be a 0-dimensional figure. In other words: a point.

>>> from de9im import pattern
>>> side_hug = pattern('FF*F0****')
>>> im = p.relate(q)
>>> print im
FF2F01212
>>> side_hug.matches(im)
True

The de9im package is 100% tested, which gives me a good starting point for experimenting with more optimal implementations.

There seems to be almost enough standardization between GeoDjango, Shapely, and SQLAlchemy that I could make these patterns callable, and call the relate method on a pair of objects:

class Pattern(object):
    def __call__(self, a, b):
        return self.matches(a.relate(b))

to use like so:

>>> side_hug(p, q)
True
[1] C. Strobl, “Dimensionally Extended Nine-Intersection Model (DE-9IM),” Encyclopedia of GIS, S. Shekhar and H. Xiong, Eds., Springer, 2008, pp. 240-245. [PDF]

Comments

reading list

Author: Jonathan Hartley

Hey Sean,

Recently I think you published a small reading list of geometric papers and the like on topics such as this, and now I can't find it again. Did I imagine this? Can you point me to it? Thanks.

Jonathan

Re: de9im: DE-9IM utilities

Author: Sean

It's http://www.zotero.org/groups/geography-and-computing. If you're interested in adding references, let me know.

Re: de9im: DE-9IM utilities

Author: Jonathan Hartley

Thanks! That link once again, without the terminating period included:

http://www.zotero.org/groups/geography-and-computing

RESTful hypermedia agents

Stuart Charlton says stuff about Building a RESTful Hypermedia Agent, Part 1:

Building a hypermedia-aware client is rather different from building a typical client in a client/server system. It may not be immediately intuitive. But, I believe the notions are rooted in (quite literally) decades of experience in other computing domains that are agent-oriented. Game behaviour engines, control systems, reactive or event-driven systems all have been developed with this programming approach in mind.

He points to a diagram from Artifical Intelligence: A Modern Approach [1] and adapts it to the RESTful web. Agent sensors become HTTP's "safe" methods (GET), effectors the "unsafe" methods (POST, PUT, DELETE). The HTTP protocol and content type definitions make up the agent's model of the evolving, mutable state of its environment (the web). I'm enjoying thinking about RESTful client-server interactions on the web in these well-reasoned terms. The REST style, to me, is all about enabling software agents. Not just web browsers or search index crawlers, but agents that might mine your texts, geocode your news, or ETL your spatial data (and wash your socks). I'm looking forward to the next installment.

[1] S.J. Russell and P. Norvig, Artificial Intelligence, Prentice Hall, 2009.

Origin of the multi-geometry

I'm trying to track down the origin of the geometry collection concept. Did it originate inside or outside GIS? JSTOR has nothing for me. Via Martin Davis, I've found a paper by Egenhofer and Herring [1] [PDF] which mentions a "complex line" on page 6:

– A complex line is a line with more than two disconnected boundaries (Figure 1d).

but makes no mention of multipoints, multilines, or multipolygons. Figure 1d in that paper shows a forking line, like a lower-case Greek lamba: λ.

Anybody have a good reference?

[1] M.J. Egenhofer and John R. Herring, Categorizing Binary Topological Relations Between Regions, Lines, and Points in Geographic Databases, Orono, ME: University of Maine, 1991.

Comments

Most likely GIS

Author: GIS oriented

How else would you represent the multiple islands of Hawaii or states like Michigan as a single shape?

Re: Origin of the multi-geometry

Author: Sean

Sure, but where did the concept first crop up? In a paper? In software?

Re: Origin of the multi-geometry

Author: Sean

Another read of that paper makes me think there may be a germ of geometry collections in "cell complexes".

Re: Origin of the multi-geometry

Author: Martin Davis

Cell complexes are quite different to Multi-geometry. They are a fairly deep topological concept.

To turn the question around - why do you care? I suspect any "origin" you come up with won't be all that interesting, since Multi-geometry is just a fairly obvious extension to single geometries, so it's likely to have been invented numerous times (how long have shapefiles been around?)